By Mihail Vladimirov.
Neither team presented any surprises in terms of selection. For Norwich, Bassong was passed fit for this game but remained outside the match squad, and Neil Adams named an unchanged starting XI from the one against Fulham last week in his managerial debut. Meanwhile with Henderson and Sturridge out, Rodgers, as expected, replaced them with Lucas and Allen.
Formations
The first thing that caught the eye in this game was the many potential permutations of how exactly each team would line up. Theoretically, both teams could have started with the same formation – either the 4-2-3-1, 4-1-2-3/4-1-4-1 or the 4-3-1-2 – but there was also the possibility of seeing them mirroring each other (one starting with 4-2-3-1 the other 4-1-2-3). Tactically, it would have been more interesting if one of them started with a diamond, and the other with a more conventional 4-1-2-3 or 4-2-3-1 shape. This would have presented both teams with clear strengths and weaknesses, making the game a fluid tactical battle.
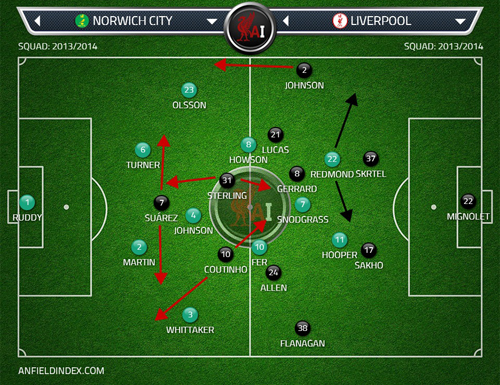
In the end Norwich continued with the 4-3-1-2 formation seen against Fulham, with Liverpool making a slight tweak, approaching the game with what was a 4-3-2-1 shape.
Rodgers’ starting approach
It was that subtle tweak – changing from 4-3-1-2 to 4-3-2-1 – that proved to be the key for Liverpool starting this game brilliantly, and is something that, as the game played out – and following the inevitable dip in performance in the second half – actually won them the game.
The rest of this tactical analysis is for Subscribers only.
[ttt-subscribe-article]