By Mihail Vladimirov.
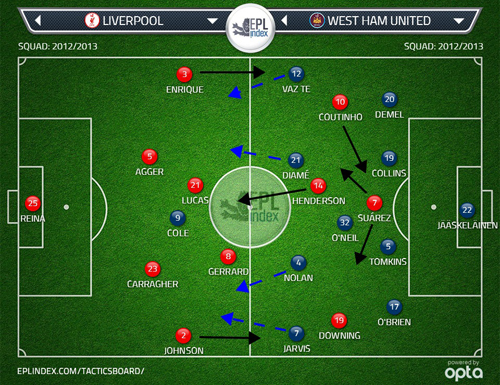
Rodgers continued with an unchanged side but tweaked his formation slightly. Last week against Aston Villa it was 4-1-2-3. Now, with Henderson as the most advanced midfielder, the shape was more of a 4-2-1-3.
For the visitors, Reid was omitted due to a problem with his thigh – Tomkins came into the side. The rest of the side was as expected and the same as in the last game against WBA (Carroll was replaced by Cole). However, like Rodgers, Allardyce also flipped the midfield shape to have a 1-2 triangle, hence the 4-1-4-1 lookalike formation.
As anticipated the match was overly one-sided. As such the general tactical excitement could be divided into two parts – how one of the teams defended and how the other attacked, or tried to attack. Although there were some changes throughout the game, there was little tactical progression, which inevitably benefited the defending team.
West Ham’s strategy
The fact Allardyce came to Anfield with the single aim of putting men behind the ball and trying to defend resolutely shouldn’t surprise anyone. The surprises came on two fronts: the defensive set-up and the attacking patterns.
West Ham generally use the typical defensive approach of having tight banks of four behind the ball, with the forward duo (often split vertically – a striker and an attacking midfielder playing just off him) sitting higher up and waiting for balls to break forward (helped by the wingers sprinting down the flanks). Here, Allardyce used an uncommon approach, for him anyway. He decided on two banks of four, but not patrolled by the attacking midfielder ahead of them. Instead he had an additional body in between the two banks of four – hence a morphing of the shape to 4-1-4-1. O’Neil was tasked with the anchoring role and Nolan dropped alongside Diame to complete the midfield duo. As a result, Cole was left to play on his own up front. This was probably Allardyce’s answer to the likelihood that Liverpool would completely boss the midfield area, hence dominating the possession too. That additional body enabled West Ham to defend with nine men behind the ball. But instead of having a 4-4-1-1 shape, the intended 4-1-4-1 allowed West Ham to occupy Liverpool’s midfield man-for-man and in the meantime cover the ground between the lines (where Suarez was expected to drop too) more solidly.
The rest of this article is for subscribers only.
[ttt-subscribe-article]