By Mihail Vladimirov.
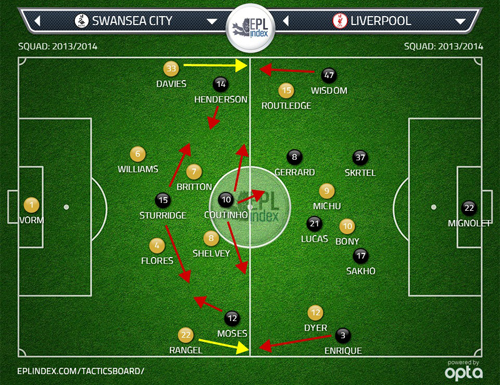
With Pablo and Canas not fit to start, Laudrup selected Dyer (who returned to fitness) and Britton in their places. With Agger left out of the squad as a precaution (as was Pablo), Sakho made his Liverpool debut. Aspas was replaced by the other debutant Moses, who played on the left to allow Coutinho to start centrally between the lines.
Liverpool started brightly but quickly and dramatically fell away after the first 25 minutes. From that point on, it was all about Swansea, and whether they could breach the visitors or not. Thus, the game offered an interesting tactical progression, but there was not a tactical contest in the true sense of the word – for the best part of the game, it was only one of the teams contesting, with the other simply put in some form of hopeless trance.
Liverpool early dominance
Both teams started with their usual formation of 4-2-3-1 – but because of the different nature of both players playing in the #10 position (Michu and Coutinho), in possession, the shapes gained a different flavour. With Michu as more of a second forward (false 10) Swansea played out like a 4-2-2-2 team with a clear tiered midfield: two deep-lying midfielders, two split forwards and wide players staying in between these two pairs to link the play. Coutinho is your typical roaming proper #10, meaning he is more of a third midfielder, even if clearly playing that bit higher up to target the whole width of the space between the opposition’s lines. As a result Liverpool’s framework looked much more like 4-2-1-3 with Coutinho trying to link-up play between the double pivot and the front trio.
The rest of this article is for subscribers only.
[ttt-subscribe-article]