While this wasn’t a particularly exciting game, from a tactical perspective there was plenty to intrigue. A fourth consecutive win under Kenny’s managership and a fourth successive clean sheet – just the sort of sequence that, in Hodgson parlance at least, would be described as a “juggernaut”.
Tactical line-ups
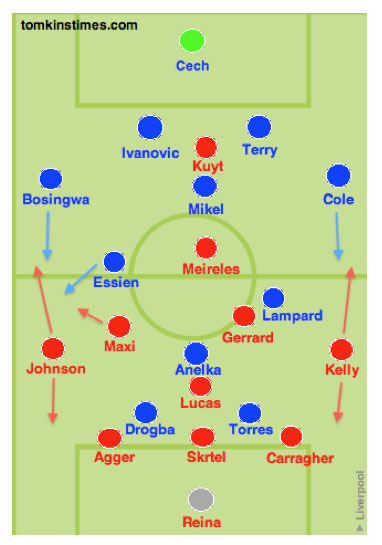
Having used a 4-3-3 for most of his Chelsea tenure, Chelsea manager Carlo Ancelotti reverted to the 4-1-2-1-2 he had experimented with against Sunderland last week – a shape he had attempted at the beginning of last season as well – employing Nicolas Anelka at the tip of a diamond midfield. This was evidently a precursor to his accommodation of Fernando Torres in the starting line-up, as the former Liverpool striker replaced Salomon Kalou alongside Didier Drogba in a two-man strike force for the Blues.
King Kenny continued with the three-man central defence he had utilised against Stoke, albeit with Jamie Carragher returning from a protracted injury lay-off following a dislocated shoulder sustained against Tottenham earlier in the season, to replace Kyrgiakos in the starting line-up. Skrtel moved to the centre of the back three, while Agger and Carra played on either side of him, as Martin Kelly and Glen Johnson reprised their wing-back roles further forward.
The Liverpool midfield four was of particular interest: while Kenny had deployed a midfield ‘square’ against Stoke, with two deeper-lying midfielders and two in advance of them, here the shape was a diamond. Lucas Leiva was the most withdrawn of the four, playing as the sole holding midfielder in front of the defence; Gerrard and Maxi operated as determined shuttlers (or ‘carrileros’) on the right and left respectively; Meireles continued in his now-familiar role ‘in the hole’, supporting lone striker Kuyt.
Key tactical points
To be sure, this was a tactical victory in a fundamentally defensive sense. For LFC, the strategy was three-fold:
1) Spare man at the back
From the outset, it appeared as if Kenny’s decision to persist with the back three in order to counter Drogba and Torres was an astute one; as I’d discussed in the post-match analysis of the Stoke game, the use of three centre-backs is – theoretically, at least – designed to be negate the threat offered by a team playing with two strikers. Two ‘markers’ contend with the two frontmen, while there is the security of the ‘spare’ defender who can ‘sweep’ up behind them. For instance, when Carragher was occupied by Torres, and Agger by Drogba, Skrtel’s role was to provide cover as the extra defender, in the eventuality of any attacking danger. Further, if one of the strikers attempted to drop deep to collect the ball – as Drogba notably did in the 35th minute – one of the central defenders (Carragher, in this situation) could pursue him with alacrity, as two central defenders remained to secure the defensive area. (As an aside, Skrtel’s cover was also crucial in the sense that, Carragher, in his advancing years, would be naturally susceptible to Torres’ pace, so have an extra defender as ‘insurance’ was imperative).
In addition, both Drogba and Torres tended to stay high up the pitch and in central areas even when Chelsea were out of possession, whereas they might have attempted to use the channels more in an attempt to drive a wedge of space between the outside centre-back – either Carragher or Agger – and Skrtel in the centre. However, the fact that both Carragher and Agger have both played at fullback before meant that they were comfortable enough to pursue the strikers into wider areas when the need arose. (Agger’s foul on Torres, close to the left touch-line at around 25 and a half minutes, is an example of such an instance).
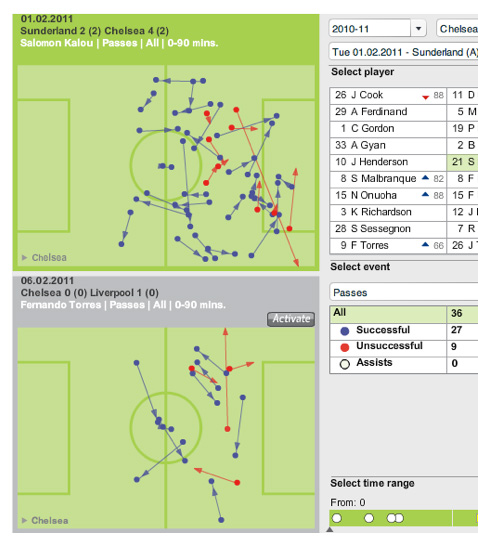
Although, admittedly, Chelsea did have plenty of chances from open play (not many clear-cut ones, to be fair), there was a distinct lack of cohesion between the front two, as Torres, in particular, cut an increasingly frustrated figure as the match wore on. His eventual substitution in the 2nd half – and the now widely-disseminated statistics showing him to have had the least number of touches of any outfield player during his time on the pitch, 29 in 66 minutes, according to OptaJoe on Twitter – suggest that Liverpool’s back three were effective at nullifying the threat posed by Torres and Drogba.
As the chalkboards below demonstrate, Salomon Kalou (whom Torres replaced in the starting line-up), was far more involved against against Sunderland – a game in which Chelsea also used the diamond formation, while Sunderland used only two centre-backs against Chelsea’s front two of Kalou and Drogba (so there was no spare man in defence) – than Torres was here against his erstwhile team:
In fact, Chelsea’s front two and Anelka looked more effective in a defensive posture: Reina was unable to distribute the ball to the peripheral centre-backs from short goal-kicks as easily as he had done against Stoke, because the Chelsea strikers would frequently mark the outside two central defenders (Torres on Carragher; Drogba pressing Agger), while Anelka would push up to close down Skrtel – forming a de facto 4-3-3 for Chelsea, but a tenuous one, as it only materialised from LFC goal-kick situations.
By the time Chelsea had made a genuine switch to a 4-3-3 in the 2nd half, so that the advanced wide-attackers might drag the 2 outer centre-backs out of position and thus create space, LFC had taken the lead; this prompted Dalglish’s instructions for the wing-backs to drop deeper – along the same ‘band’ as the centre-backs – creating a 5 versus 3 advantage in defence for LFC (3 centre-backs plus two full-backs, in effect, against 3 CFC attackers). It therefore allowed the three centre-backs to remain central and not get drawn out wide to confront the likes of Kalou and Malouda. This necessarily entailed a shortfall further up the pitch for LFC, but it proved inconsequential as the Reds sought to cede both territory and possession in an attempt to remain defensively impermeable.
2. Matching Chelsea’s shape in midfield
Kenny’s rationale for altering the midfield square used against Stoke, to a diamond here, was presumably to replicate Chelsea’s own alignment in midfield. As Michael Cox of ZonalMarking.net correctly points out, each LFC midfielder had what was essentially a direct opponent in midfield: Lucas, as the deepest of the four, picked up Anelka in the trequartista role; Gerrard tracked Lampard; Maxi confronted Essien; and Meireles contended with Mikel further up the pitch.
Lucas, in particular, was brilliant at restricting Anelka’s efforts to find space behind the two Chelsea strikers – as the Frenchman had done to great effect in his ‘trequartista’ role against Sunderland – by closing down astutely and tracking his movements between the lines. By virtue of the diamond midfield’s structure, the major creative burden of the team rests on the player at the apex of the diamond; keeping this player (Anelka) subdued was thus crucial.
The rest of this post – plus additional analysis of the Stoke game – is for Subscribers only.
[ttt-subscribe-article]

